 Save
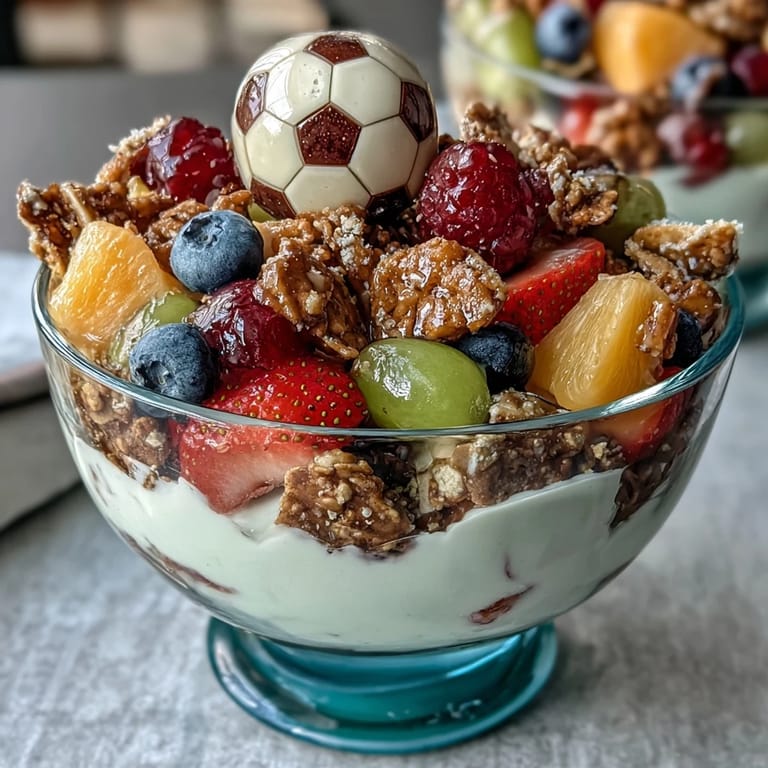
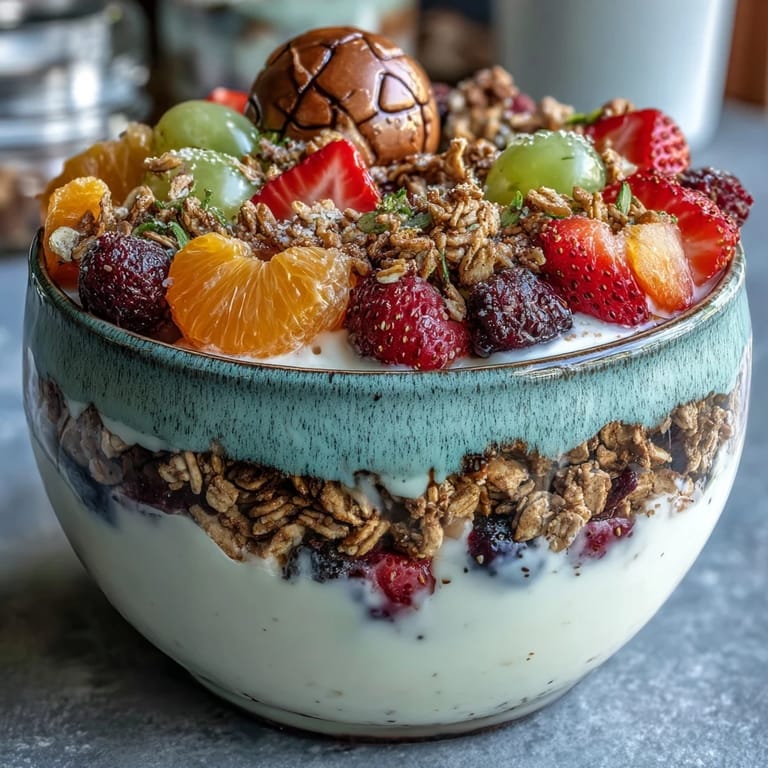
Save Last spring, my daughter's soccer coach asked if I could bring snacks for the team's midweek practice, and I wanted something that felt special but wouldn't melt in the sun. These little cups came together almost by accident in my kitchen that morning—layering yogurt, fruit, and granola in clear cups felt both fancy and practical. The kids' faces when they saw them lined up on the sideline, each one topped with a tiny soccer ball sticker, made me realize snacks could be fun without being complicated.
I still think about the one kid who asked if he could have the cup with extra blueberries because blue was his favorite color on the team jersey. Small moments like that reminded me why I love making food for groups—it's not just about filling stomachs, it's about seeing someone's day get a little brighter.
Ingredients
- Strawberries: Hulled and diced, they release just enough juice to keep everything moist without soaking the granola if you're serving right away.
- Blueberries: Leave them whole so they roll around in each bite and feel like little flavor surprises.
- Green grapes: Halved, they add sweetness and a pop of color that makes the cups look vibrant.
- Pineapple: Diced fresh is best, though frozen thawed works if that's what you have on hand.
- Vanilla Greek yogurt: The tanginess balances the fruit's sweetness, and the thicker texture holds the layers together better than regular yogurt would.
- Granola: Two cups keeps the layers balanced and gives you that essential crunch without overpowering the fruit.
- Mini chocolate chips: Optional, but they're the tiny luxury that makes kids feel like they're getting dessert disguised as a healthy snack.
- Shredded coconut: Adds a tropical whisper if you're working with pineapple or just want extra texture.
- Soccer ball toppers: These turn a snack into a moment of team pride and make cleanup easier since kids can grab them by the stick.
Tired of Takeout? 🥡
Get 10 meals you can make faster than delivery arrives. Seriously.
One email. No spam. Unsubscribe anytime.
Instructions
- Wash and prepare your fruit:
- Rinse everything while you're thinking about other things, then dry thoroughly so wet fruit doesn't water down the yogurt. Having everything prepped and sitting in bowls makes the assembly line feel smooth and less rushed.
- Line up your cups:
- Arrange all twelve clear cups on a tray or baking sheet so you can see exactly how much space you're working with. This prevents you from overstuffing the first few cups and running out of room for the last ones.
- Start with yogurt:
- Spoon two tablespoons of yogurt into the bottom of each cup—this creates a creamy foundation that holds the fruit in place. The cold yogurt tastes refreshing on its own while you're layering everything else.
- Add your fruit mix:
- Scatter about three tablespoons of mixed fruit over the yogurt, pressing gently so nothing's too loose. The colors stacked together already start looking beautiful at this point.
- Granola layer:
- Sprinkle two to three tablespoons of granola over the fruit, letting some pieces nestle between the fruit pieces. You'll hear that satisfying crunch sound when you press down slightly, which means you've got the right amount.
- Top it off:
- Add more fruit or yogurt if the cup looks like it needs it to reach near the top, keeping things balanced. The layers should feel intentional, not haphazard.
- Optional finishing touches:
- Sprinkle a few chocolate chips or shredded coconut on top if you're using them, keeping it light so it doesn't overshadow the fruit. This is where you add personality to the cups.
- Add team spirit:
- Press a soccer ball topper or sticker onto each cup just before serving, making sure kids can see what they're grabbing. The tactile act of putting these on makes even the preparation feel like part of the fun.
- Serve strategically:
- If you're serving right away, go ahead and eat them fresh. If you're making them ahead, keep the granola separate and stir it in just before serving so it stays crunchy and doesn't turn soggy.
 Save
Save There's something magical about making food that doesn't feel like work, especially when it brings a team together on an ordinary Wednesday afternoon. These cups remind me that feeding people well doesn't always mean spending hours at the stove.
Flavor Combinations Worth Trying
Once you've made these the traditional way, your kitchen brain starts spinning with variations. I've done a tropical version with mango and coconut granola that tastes like vacation, and a berry-heavy mix that looked so deep and jewel-toned the kids thought they were fancy. The beauty is that you can swap fruit seasonally without changing a single other thing—winter calls for pomegranate and pear, summer begs for peaches and cherries.
Dietary Customization Made Simple
Someone always needs a dairy-free or gluten-free version, and I love that this recipe bends easily without complaining. Plant-based yogurt works beautifully, gluten-free granola tastes just as crunchy, and the fruit doesn't care what dietary restriction you're following. I've made full batches using both regular and alternative versions just to keep everyone included, which takes maybe an extra two minutes of thought.
Storage and Make-Ahead Strategy
These cups are most delicious assembled just before eating, but life isn't always that simple when you're coordinating snacks for teams and events. The yogurt and fruit can sit together in the fridge for a few hours without complaint, and the granola keeps happily separate in a container at room temperature. You can even prep all your fruit the night before and simply assemble everything when you're ready, turning a hectic morning into something manageable.
- Prep fruit up to 24 hours ahead if you need breathing room on game day.
- Store assembled cups (with granola added) in the refrigerator for no more than 2 to 3 hours before serving to maintain that perfect texture contrast.
- If you're traveling with them, nestle the cups carefully in a flat container so they don't tip over or shift during the drive.
 Save
Save These snack cups taught me that the best foods are the ones that feed both hunger and happiness, all at the same time. Every time I make them, I'm reminded that feeding a crowd well is one of the kindest things a kitchen can do.
Recipe FAQs
- → What fruits work best for these snack cups?
Use a mix of berries, grapes, pineapple, or other firm, diced fruits to add freshness and texture.
- → Can I make these cups vegan-friendly?
Yes, substitute dairy yogurt with plant-based yogurt and use vegan granola for a dairy-free option.
- → How do I keep the granola crunchy?
Add the granola just before serving or right before eating to maintain its crunchiness.
- → Are these cups suitable for gluten-free diets?
Using certified gluten-free granola ensures the snack cups remain gluten-free.
- → What are some fun ways to present these cups?
Decorate each serving with themed toppers or stickers to add a playful touch and team spirit.